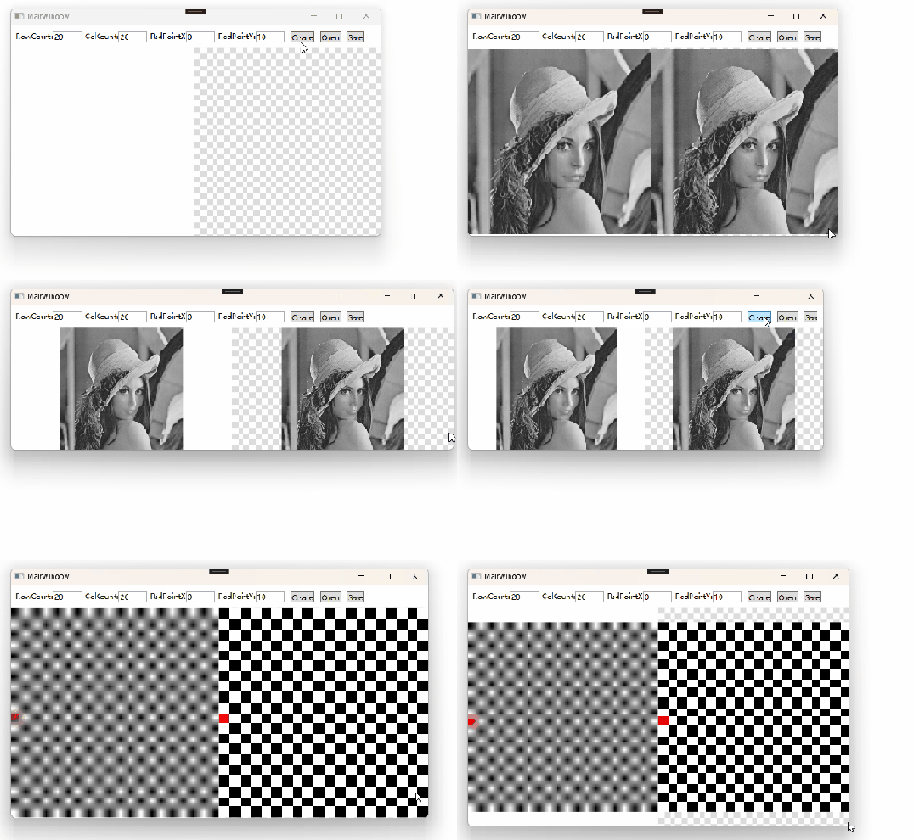
在一些图像算法调试软件中,通常调试者对于图像查看有着较多的需求,例如:缩放、移动、添加一些标记或者卡尺之类的,对于这些需求WPF的Image控件就完全不够用,这里尝试做一个这样的自定义的图像查看控件。
控件开发思路如下:
- 图像的展示还是使用Image控件
- 使用一个大小随着子控件变化而变化的容器装这个Image控件,以便控制Image的尺寸和位置
- 利用
margin来体现移动 - 通过改变
BitmapSource的Size来体现缩放 - 在图像之上盖一层
Canvas来放置标记或者卡尺
创建一个WPF自定义控件库项目,这样方便应用在别的项目上
首先写Image的容器,这个容器继承自Panel,容器大小与容器中元素最大宽高一致,并让容器中最后一个元素填充整个容器
SimplePanel.cs
using System;
using System.Windows;
using System.Windows.Controls;

namespace ImageViewer
{
    /// <summary>
    /// 此容器中最后一个元素将填充整个容器,并按父容器比例缩放
    /// </summary>
    public class SimplePanel : Panel
    {
        public SimplePanel()
        {
            //默认子元素不能超出容器边界
            ClipToBounds = true;
        }

        /// <summary>
        /// 父容器尺寸发生变化/自身布局变化时被调用,用以告知父容器自身所需大小以便父容器排布
        /// </summary>
        /// <param name="availableSize">容器中可用的大小</param>
        /// <returns>返回给父容器自身所需大小</returns>
        protected override Size MeasureOverride(Size availableSize)
        {
            var maxSize = new Size();

            //以子元素最大宽、高作为所需大小
            foreach (UIElement child in InternalChildren)
            {
                if (child == null) continue;
                child.Measure(availableSize);
                maxSize.Width = Math.Max(maxSize.Width, child.DesiredSize.Width);
                maxSize.Height = Math.Max(maxSize.Height, child.DesiredSize.Height);
            }

            return maxSize;
        }

        /// <summary>
        /// 调用时机与 <see cref="MeasureOverride"/> 一致
        /// </summary>
        /// <param name="finalSize">父容器最终分配的大小</param>
        /// <returns>最后控件的尺寸和大小</returns>
        protected override Size ArrangeOverride(Size finalSize)
        {
            foreach (UIElement child in InternalChildren)
            {
                //以容器分配的大小排布子元素,位置为(0,0)
                child?.Arrange(new Rect(finalSize));
            }

            return finalSize;
        }
    }
}
容器重写MeasureOverride,ArrangeOverride,实现了容器大小与子元素最大宽高一致并以最后一个子元素从左上角铺满整个容器,接下来定义ImageViewer
ImageViewer.cs
using System.Windows;
using System.Windows.Controls;
using System.Windows.Media.Imaging;

namespace ImageViewer
{
    public class ImageViewer : Control
    {
        #region Properties

        /// <summary>
        /// 是否已加载模板
        /// </summary>
        private bool _isLoaded;

        /// <summary>
        ///     图片宽高比
        /// </summary>
        private double _imgWidHeiScale;

        #endregion Properties

        #region DependencyProperties

        internal double ImageScale
        {
            get => (double)GetValue(ImageScaleProperty);
            set => SetValue(ImageScaleProperty, value);
        }

        internal static readonly DependencyProperty ImageScaleProperty = DependencyProperty.Register(
            nameof(ImageScale), typeof(double), typeof(ImageViewer), new PropertyMetadata(1d, OnImageScaleChanged));

        private static void OnImageScaleChanged(DependencyObject d, DependencyPropertyChangedEventArgs e)
        {
            if (!(d is ImageViewer imageViewer) || !(e.NewValue is double newValue)) return;
            imageViewer.ImageWidth = imageViewer.ImageOriWidth * newValue;
            imageViewer.ImageHeight = imageViewer.ImageOriHeight * newValue;
        }

        internal Thickness ImageMargin
        {
            get => (Thickness)GetValue(ImageMarginProperty);
            set => SetValue(ImageMarginProperty, value);
        }

        /// <summary>
        ///     图片原始宽度
        /// </summary>
        private double ImageOriWidth { get; set; }

        /// <summary>
        ///     图片原始高度
        /// </summary>
        private double ImageOriHeight { get; set; }

        internal static readonly DependencyProperty ImageMarginProperty = DependencyProperty.Register(
            nameof(ImageMargin), typeof(Thickness), typeof(ImageViewer), new PropertyMetadata(default(Thickness)));

        internal double ImageWidth
        {
            get => (double)GetValue(ImageWidthProperty);
            set => SetValue(ImageWidthProperty, value);
        }

        internal static readonly DependencyProperty ImageWidthProperty = DependencyProperty.Register(
            nameof(ImageWidth), typeof(double), typeof(ImageViewer), new PropertyMetadata(0d));

        internal double ImageHeight
        {
            get => (double)GetValue(ImageHeightProperty);
            set => SetValue(ImageHeightProperty, value);
        }

        internal static readonly DependencyProperty ImageHeightProperty = DependencyProperty.Register(
            nameof(ImageHeight), typeof(double), typeof(ImageViewer), new PropertyMetadata(0d));

        public BitmapSource ImageSource
        {
            get => (BitmapSource)GetValue(ImageSourceProperty);
            set => SetValue(ImageSourceProperty, value);
        }

        public static readonly DependencyProperty ImageSourceProperty = DependencyProperty.Register(
            nameof(ImageSource), typeof(BitmapSource), typeof(ImageViewer), new PropertyMetadata(default(BitmapSource), OnImageSourceChanged));

        private static void OnImageSourceChanged(DependencyObject d, DependencyPropertyChangedEventArgs e)
        {
            var ctl = (ImageViewer)d;
            ctl.Init();
        }

        #endregion DependencyProperties

        static ImageViewer()
        {
            DefaultStyleKeyProperty.OverrideMetadata(typeof(ImageViewer), new FrameworkPropertyMetadata(typeof(ImageViewer)));
        }

        public ImageViewer()
        {
            Loaded += (s, e) =>
            {
                _isLoaded = true;
                Init();
            };
        }

        protected override void OnRenderSizeChanged(SizeChangedInfo sizeInfo)
        {
            //避免容器尺寸有小于0时,scale计算出double.nan的异常
            if (ActualHeight < 0.001 || ActualWidth < 0.001)
                return;
            if (IsLoaded)
                ImgSizeAdaption();
            AutoCentering();
        }

        private void Init()
        {
            if (ImageSource == null || !_isLoaded) return;
            ImageScale = 1;
            //记录宽高
            ImageWidth = ImageSource.PixelWidth;
            ImageHeight = ImageSource.PixelHeight;
            //原始宽高
            ImageOriWidth = ImageSource.PixelWidth;
            ImageOriHeight = ImageSource.PixelHeight;
            //记录图像宽高比
            _imgWidHeiScale = _imgWidHeiScale = ImageWidth / ImageHeight;

            ImgSizeAdaption();
            AutoCentering();
        }

        private void ImgSizeAdaption()
        {
            //容器宽高比
            var windowScale = ActualWidth / ActualHeight;

            //宽度大,宽度与容器对齐
            if (_imgWidHeiScale > windowScale)
                ImageScale *= ActualWidth / ImageWidth;
            //高度大,高度与容器对齐
            else
                ImageScale *= ActualHeight / ImageHeight;
        }

        private void AutoCentering()
        {
            //图片居中
            ImageMargin = new Thickness((ActualWidth - ImageWidth) / 2, (ActualHeight - ImageHeight) / 2, 0, 0);
        }
    }
}
在这个ImageViewer中主要实现了两个功能
- 通过
ImageScale(默认为 1 表示无缩放)来控制图像等比例缩放,在OnImageScaleChanged中以新的ImageScale乘以图像原始宽高得到新的图片尺寸;ImgSizeAdaption函数通过判断容器宽高比与图片宽高比来调整缩放,以保证长边对齐容器,缩放效果与Stretch="Uniform"一致,这里要注意一点,这里ImageScale是乘以新的比例而非直接等于,这个操作运算实现了在原有的尺寸上缩放而非在图像原始尺寸上缩放 - 通过
ImageMargin来控制图片位置,AutoCentering函数通过容器宽高减图像宽高来调整位置,实现居中对齐
此外,这里让控件尺寸变化时重新居中和缩放,以确保显示正常
Generic.xaml
<ResourceDictionary
    xmlns="http://schemas.microsoft.com/winfx/2006/xaml/presentation"
    xmlns:x="http://schemas.microsoft.com/winfx/2006/xaml"
    xmlns:local="clr-namespace:ImageViewer">

    <DrawingBrush
        x:Key="MosaicBrush"
        TileMode="Tile"
        Viewport="0,0,20,20"
        ViewportUnits="Absolute">
        <DrawingBrush.Drawing>
            <DrawingGroup>
                <DrawingGroup.Children>
                    <GeometryDrawing Brush="White">
                        <GeometryDrawing.Geometry>
                            <RectangleGeometry Rect="0,0,10,10" />
                        </GeometryDrawing.Geometry>
                    </GeometryDrawing>
                    <GeometryDrawing Brush="#DCDCDC">
                        <GeometryDrawing.Geometry>
                            <RectangleGeometry Rect="0,0,5,5" />
                        </GeometryDrawing.Geometry>
                    </GeometryDrawing>
                    <GeometryDrawing Brush="#DCDCDC">
                        <GeometryDrawing.Geometry>
                            <RectangleGeometry Rect="5,5,5,5" />
                        </GeometryDrawing.Geometry>
                    </GeometryDrawing>
                </DrawingGroup.Children>
            </DrawingGroup>
        </DrawingBrush.Drawing>
    </DrawingBrush>

    <Style TargetType="{x:Type local:ImageViewer}">
        <Setter Property="Background" Value="Transparent" />
        <Setter Property="Focusable" Value="False" />
        <Setter Property="Template">
            <Setter.Value>
                <ControlTemplate TargetType="{x:Type local:ImageViewer}">
                    <local:SimplePanel x:Name="PART_Panel" Background="{StaticResource MosaicBrush}">
                        <Image
                            Name="PART_Image"
                            Width="{TemplateBinding ImageWidth}"
                            Height="{TemplateBinding ImageHeight}"
                            Margin="{TemplateBinding ImageMargin}"
                            HorizontalAlignment="Left"
                            VerticalAlignment="Top"
                            RenderOptions.BitmapScalingMode="NearestNeighbor"
                            RenderTransformOrigin="0.5,0.5"
                            Source="{TemplateBinding ImageSource}" />
                    </local:SimplePanel>
                </ControlTemplate>
            </Setter.Value>
        </Setter>
    </Style>
</ResourceDictionary>
在样式里通过MosaicBrush马赛克笔刷给SimplePanel刷上马赛克背景
到这一步就先告一段落了,创建Application项目看看效果
MainViewModel.cs
using System;
using System.Collections.Generic;
using System.ComponentModel;
using System.Drawing;
using System.Drawing.Imaging;
using System.IO;
using System.Runtime.CompilerServices;
using System.Windows.Input;
using System.Windows.Media.Imaging;
using Microsoft.Win32;
using Prism.Commands;

namespace ImageViewerDemo
{
    public class MainViewModel : INotifyPropertyChanged
    {
        public static MainViewModel Instance => new MainViewModel();

        private BitmapImage _bitmapImage;

        public BitmapImage BitmapImage
        {
            get => _bitmapImage;
            set
            {
                _bitmapImage = value;
                OnPropertyChanged();
            }
        }

        private int _rowCount = 500;

        public int RowCount
        {
            get => _rowCount;
            set
            {
                _rowCount = value;
                OnPropertyChanged();
            }
        }

        private int _columnCount = 500;

        public int ColumnCount
        {
            get => _columnCount;
            set
            {
                _columnCount = value;
                OnPropertyChanged();
            }
        }

        private int _posX;

        public int PosX
        {
            get => _posX;
            set
            {
                _posX = value;
                OnPropertyChanged();
            }
        }

        private int _posY = 10;

        public int PosY
        {
            get => _posY;
            set
            {
                _posY = value;
                OnPropertyChanged();
            }
        }

        public ICommand CreateCommand { get; }

        public ICommand SaveCommand { get; }

        public ICommand OpenCommand { get; }

        public event PropertyChangedEventHandler PropertyChanged;

        public MainViewModel()
        {
            CreateCommand = new DelegateCommand(() =>
            {
                if (RowCount < 1 || ColumnCount < 1)
                    return;
                BitmapImage = CreateCheckerboard(RowCount, ColumnCount, new List<Point> { new Point(PosX, PosY) });
            });

            SaveCommand = new DelegateCommand(() =>
            {
                if (BitmapImage == null)
                    return;
                SaveBitmapImage(BitmapImage, "saved_img.bmp");
            });

            OpenCommand = new DelegateCommand(() =>
            {
                var img = OpenBitmapImage();
                if (img == null)
                    return;
                BitmapImage = img;
            });
        }

        protected virtual void OnPropertyChanged([CallerMemberName] string propertyName = null)
        {
            PropertyChanged?.Invoke(this, new PropertyChangedEventArgs(propertyName));
        }

        private static BitmapImage OpenBitmapImage()
        {
            // 创建 OpenFileDialog 对象
            var openFileDialog = new OpenFileDialog
            {
                // 设置过滤器,只允许选择图片文件
                Filter = "图片文件 (*.jpg; *.png; *.bmp)|*.jpg;*.png;*.bmp"
            };

            // 如果用户选择了文件并单击了“打开”按钮,则返回 true
            if (openFileDialog.ShowDialog() != true) return null;

            // 获取所选文件的路径
            var filePath = openFileDialog.FileName;

            // 使用 BitmapImage 加载图片文件
            var bitmap = new BitmapImage();
            bitmap.BeginInit();
            bitmap.UriSource = new Uri(filePath);
            bitmap.EndInit();

            // 将图片显示在 Image 控件中
            return bitmap;
        }

        private static void SaveBitmapImage(BitmapImage img, string path)
        {
            if (img == null) throw new ArgumentNullException(nameof(img));
            // 创建一个 FileStream 对象并将 BitmapImage 保存为文件
            using (var stream = new FileStream(path, FileMode.Create))
            {
                var encoder = new BmpBitmapEncoder();  // 使用 JpegBitmapEncoder 将图像编码为 JPEG 格式
                encoder.Frames.Add(BitmapFrame.Create(img)); // 将 BitmapImage 添加到编码器中
                encoder.Save(stream);  // 保存编码后的图像到文件流
            }
        }

        private static BitmapImage CreateCheckerboard(int rowCount, int columnCount, List<Point> markPoint)
        {
            var bitmap = new Bitmap(columnCount, rowCount);
            // 循环遍历每个像素
            for (var y = 0; y < rowCount; y++)
            {
                for (var x = 0; x < columnCount; x++)
                {
                    // 如果 x 和 y 坐标的和为偶数,则将像素设置为黑色,否则设置为白色
                    bitmap.SetPixel(x, y, (x + y) % 2 == 0 ? Color.Black : Color.White);
                }
            }

            foreach (var point in markPoint)
                if (point.X < bitmap.Width && point.Y < bitmap.Height)
                    bitmap.SetPixel(point.X, point.Y, Color.Red);

            return Bitmap2BitmapImage(bitmap);
        }

        private static BitmapImage Bitmap2BitmapImage(Bitmap bitmap)
        {
            if (bitmap == null) throw new ArgumentNullException(nameof(bitmap));
            var bitmapImage = new BitmapImage();
            using (var memory = new MemoryStream())
            {
                bitmap.Save(memory, ImageFormat.Bmp);
                memory.Position = 0;
                bitmapImage.BeginInit();
                bitmapImage.StreamSource = memory;
                bitmapImage.CacheOption = BitmapCacheOption.OnLoad;
                bitmapImage.EndInit();
            }
            return bitmapImage;
        }
    }
}
这里提供了几个简单的功能
- 创建马赛克图片,这个马赛克图片对于后面设计调试滚轮缩放以及拖动图像很重要
- 打开图片
- 保存图片
MainWindow.xaml
<Window
    x:Class="ImageViewerDemo.MainWindow"
    xmlns="http://schemas.microsoft.com/winfx/2006/xaml/presentation"
    xmlns:x="http://schemas.microsoft.com/winfx/2006/xaml"
    xmlns:d="http://schemas.microsoft.com/expression/blend/2008"
    xmlns:iv="clr-namespace:ImageViewer;assembly=ImageViewer"
    xmlns:local="clr-namespace:ImageViewerDemo"
    xmlns:mc="http://schemas.openxmlformats.org/markup-compatibility/2006"
    Title="MainWindow"
    Width="650"
    Height="400"
    d:DataContext="{d:DesignInstance local:MainViewModel}"
    DataContext="{x:Static local:MainViewModel.Instance}"
    mc:Ignorable="d">
    <Grid>
        <Grid.RowDefinitions>
            <RowDefinition Height="auto" />
            <RowDefinition Height="*" />
        </Grid.RowDefinitions>
        <StackPanel
            Grid.Row="0"
            Margin="10"
            Orientation="Horizontal">
            <TextBlock Text="RowCount:" />
            <TextBox Width="50" Text="{Binding RowCount}" />
            <TextBlock Margin="5,0,0,0" Text="ColCount:" />
            <TextBox Width="50" Text="{Binding ColumnCount}" />
            <TextBlock Margin="5,0,0,0" Text="RedPointX:" />
            <TextBox Width="50" Text="{Binding PosX}" />
            <TextBlock Margin="5,0,0,0" Text="RedPointY:" />
            <TextBox Width="50" Text="{Binding PosY}" />
            <Button
                Margin="10,0,0,0"
                Command="{Binding CreateCommand}"
                Content="Create" />
            <Button
                Margin="10,0,0,0"
                Command="{Binding OpenCommand}"
                Content="Open" />
            <Button
                Margin="10,0,0,0"
                Command="{Binding SaveCommand}"
                Content="Save" />
        </StackPanel>
        <Grid Grid.Row="1">
            <Grid.ColumnDefinitions>
                <ColumnDefinition Width="1*" />
                <ColumnDefinition Width="1*" />
            </Grid.ColumnDefinitions>
            <Image
                Grid.Column="0"
                Source="{Binding BitmapImage}"
                Stretch="Uniform" />
            <iv:ImageViewer
                Name="ImageViewer"
                Grid.Column="1"
                ImageSource="{Binding BitmapImage}" />
        </Grid>
    </Grid>
</Window>
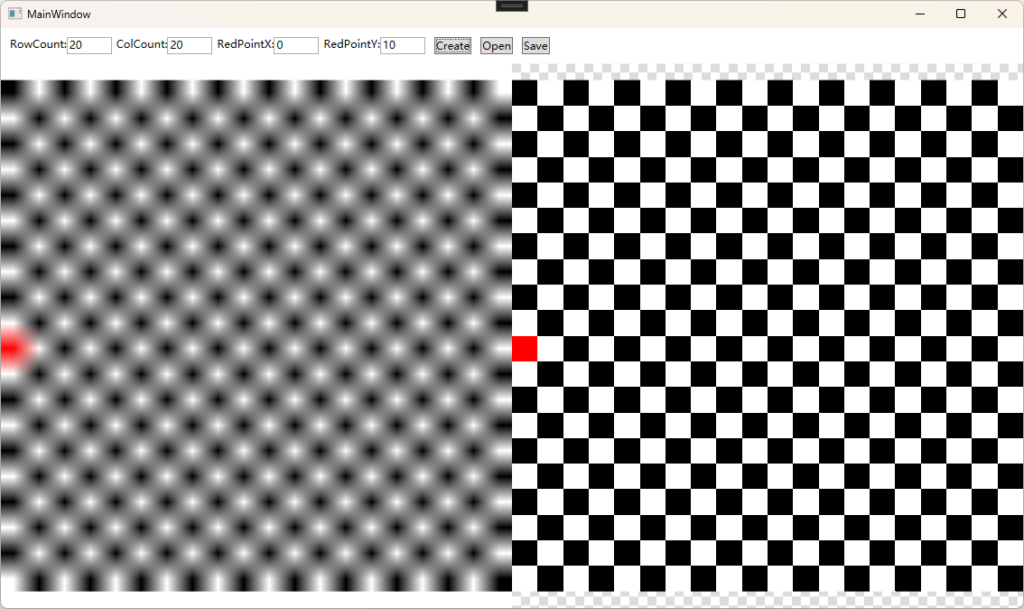
在MainWindow中,作为对比,窗口中额外添加了一个原生的Image控件来显示同一张图片,用Stretch="Uniform"来实现图片缩放铺满整个Image,来看看效果


这里原生控件显示的图片与ImageViewer显示的图片明显不一样,这是因为Image对图像进行了插值和模糊,图像怎样放大也不会看到像素格